
Start Wired Connection
Follow the procedure below to setup a printer.
![]() Note
Note
- Notes on Wired Connection (Appears in a new window)
-
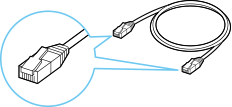
You will need an Ethernet cable (sold separately).
-
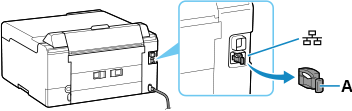
Remove the Cap (A) from the port located on the left side at the back of the printer.
-
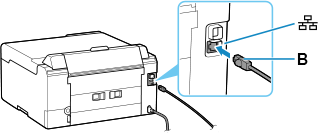
Connect the printer and a network device (router, etc.) with an Ethernet cable (B).
Do not connect to any other port.
-
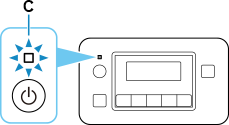
Make sure printer is turned on.
If the power is on, the ON lamp (C) will be lit or flashing.
 Important
- If printer is performing cleaning, print head alignment, or other processes, wait for the process to finish, before starting setup.
-
Check the screen displayed on the printer.
If None of the Following Screens is Displayed:


![Easy WL connect screen: [Easy WL connect] is completed](screens/trl-s087.gif)

-
Restart printer.
Press the ON button to turn off the power, and then turn it back on.
Important- If a USB cable is connected to the printer, disconnect it.
-
After completing the following on your operating system, click the close button on the Web browser to close this guide.
If performing setup with software, return to the software and proceed with the installation.
Windows
Click
 in the taskbar at the bottom of the computer screen (
 ), and then follow the on-screen instructions to proceed with setup.
macOS
Click
 in the Dock at the bottom of the computer screen (
 ), and then follow the on-screen instructions to proceed with setup.
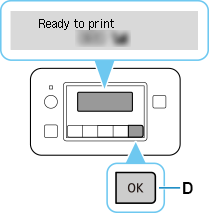
If One of the Following Screens is Displayed:
-
If the following screen is not displayed, press the OK button (D) once or twice to display the screen.
-
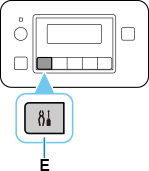
Press the Setup button (E).
-
Use the
 or
or  button (F) to select Device settings, then press the OK button.
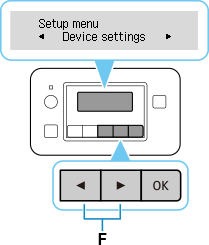
-
Select LAN settings and press the OK button.
-
Select Wired LAN and press the OK button.
-
Select Enab./dis. wired LAN and press the OK button.
-
Select Enable and press the OK button.
-
If the screen on the below appears, press the OK button.
If the following screen is not displayed, proceed to the next step.

-
Press the Setup button.
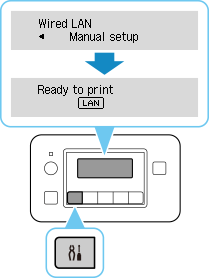
The network connection setup is now complete.
When connection is complete,
 appears on screen.
 -
After completing the following on your operating system, click the close button on the Web browser to close this guide.
If performing setup with software, return to the software and proceed with the installation.
Windows
Click
in the taskbar at the bottom of the computer screen (), and then follow the on-screen instructions to proceed with setup.macOS
Click
in the Dock at the bottom of the computer screen (), and then follow the on-screen instructions to proceed with setup.
